Looking for a foolproof pie crust recipe that contains no lard or shortening? This All-butter Blender Pie Crust is for you!
Whether you’re making apple pie, peach mango pie, or any other buttery flaky-based pie, this foolproof pie crust recipe will be sure to bring out the best in your delicious filling.
Blender Pie Crust Ingredients
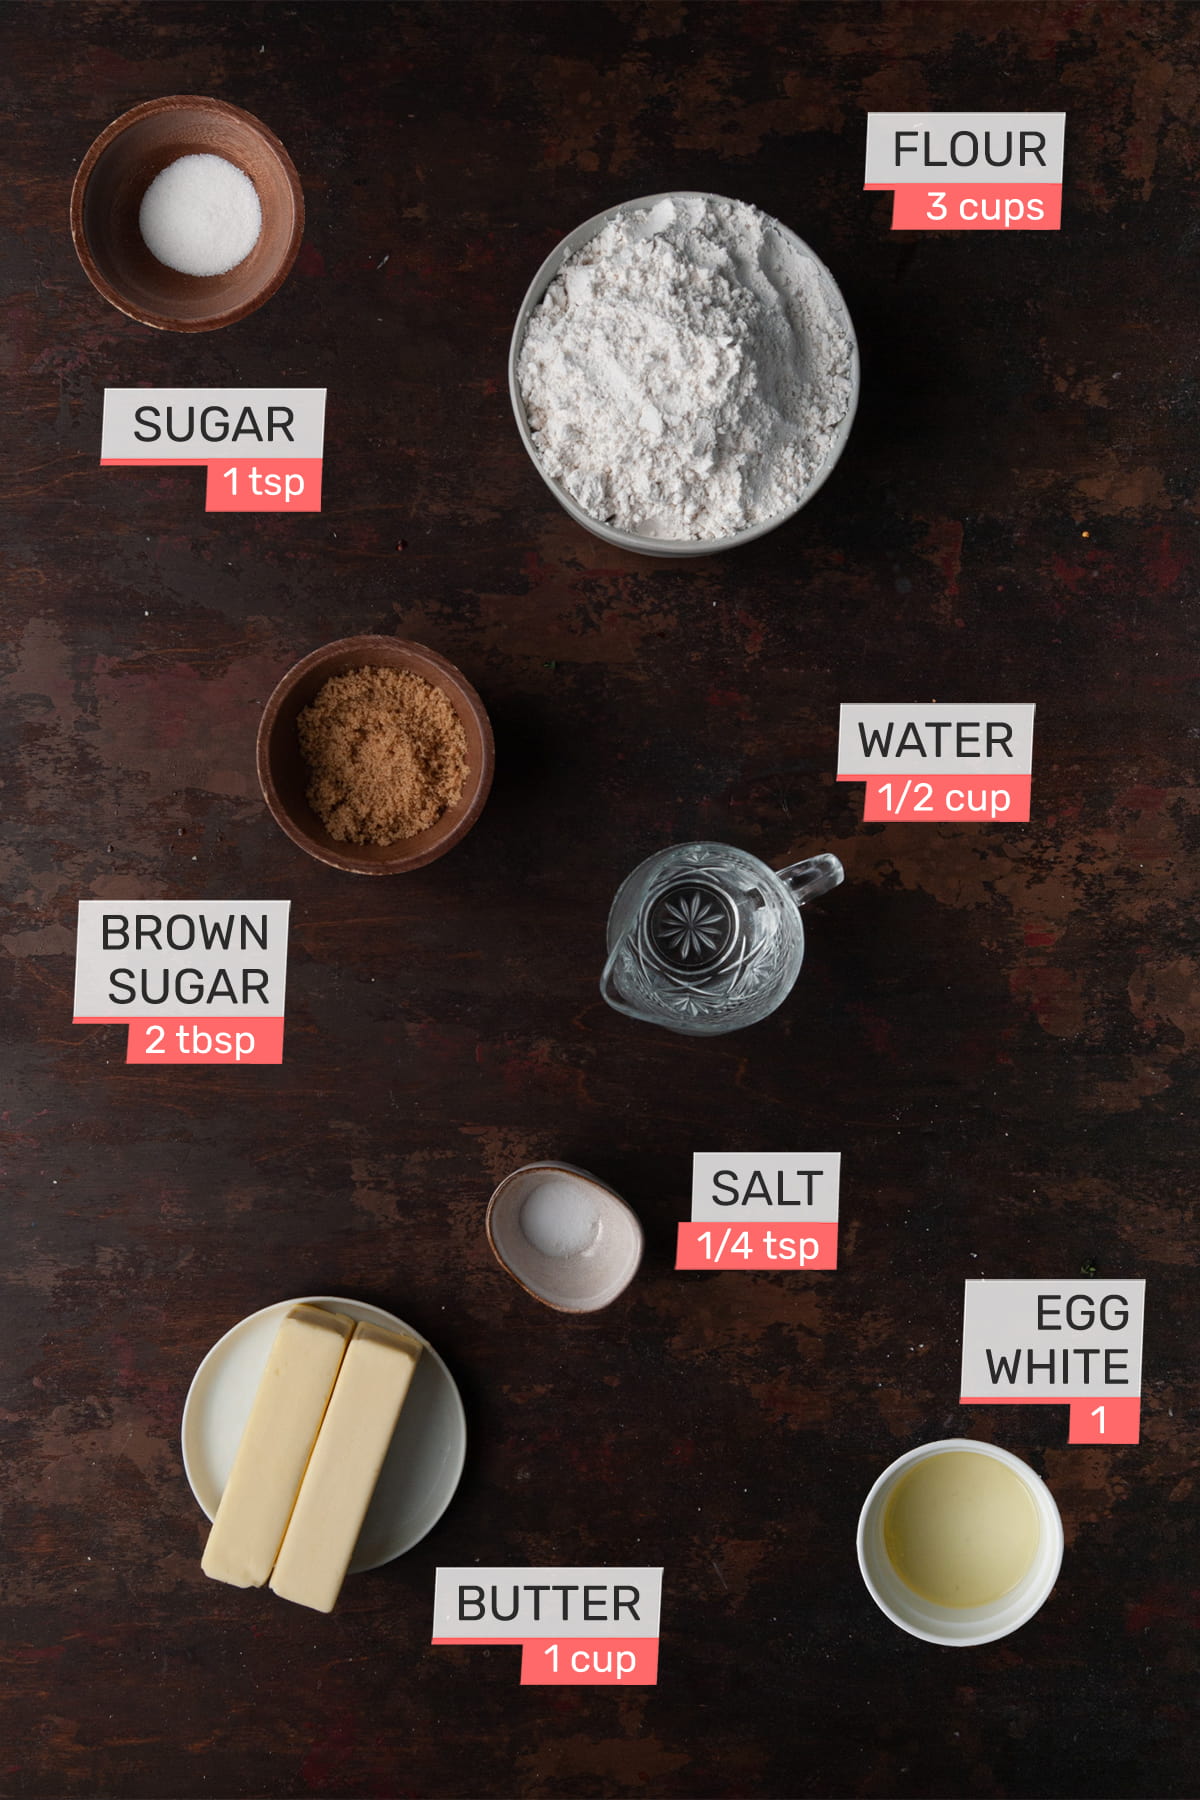
Here’s everything you need:
- Unsalted butter. It should be frozen so it doesn’t break down too much in the blender.
- All-purpose flour. The base of your pie crust dough.
- Brown sugar. For subtle sweetness.
- Salt. For flavor.
- Cold water. Cold so it does not melt the butter.
- Egg white and granulated sugar. To brush on top to get a perfect crispy, caramelized exterior.
Blender Pie Crust Tips and Tricks
Use Frozen Butter
Starting with frozen butter means it will break down more slowly in the blender which is ideal. Leaving little chunks of butter in your pie crust means that the butter will melt in little puddles when you bake it, resulting in a super flaky, melt-in-your-mouth crust.
Green tip: Look for organic and palm oil-free butter if you can. Buying organic means you are supporting farms that do not use damaging pesticides and fertilizers, and palm oil production is a huge driver behind deforestation.
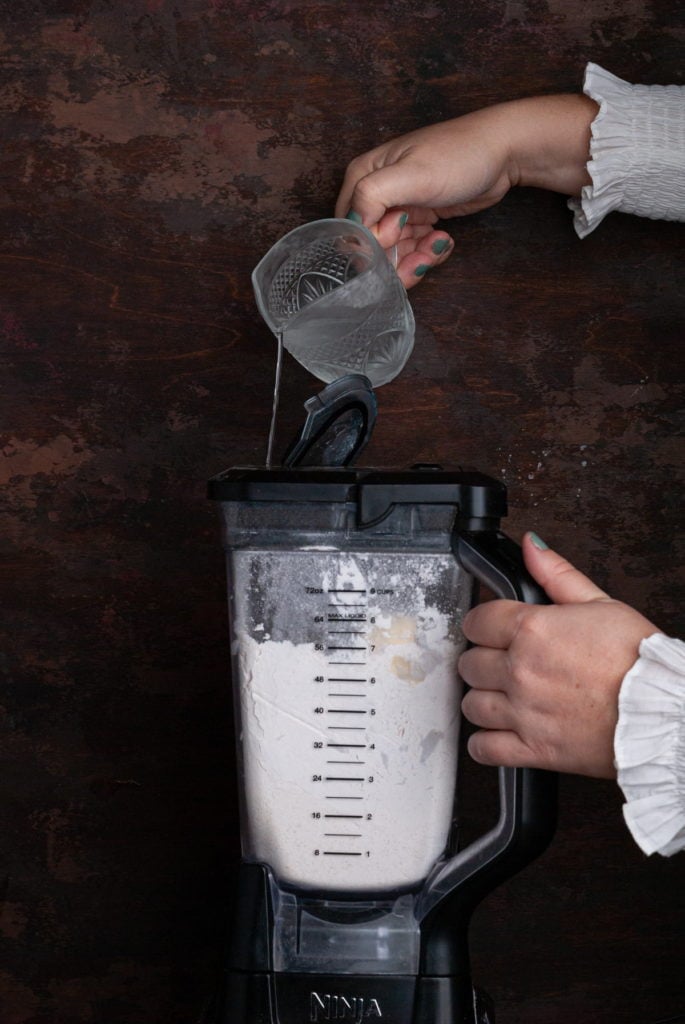
Add Water With the Blender On
Once you add your butter, flour, sugar, and salt to your blender, blend on high for just about 15-30 seconds or so, until the butter is broken into chunks.
Then, with your blender on, add the cold water and continue to blend for another 10-15 seconds or so until it starts to form a dough. Using cold water will keep your butter cold and intact.
By the time you are done blending, you should still have chunks of butter remaining in your dough.
Use Your Hands
It’s best not to over-blend your dough. This means once you’ve briefly blended your ingredients together, pour the contents of your blender into a large mixing bowl or onto a clean, floured surface.
Use your hands to work the dough, combining any excess flour and transforming it into a thick, smooth dough, with some remaining butter chunks.
Green tip: 50% of food waste happens at home. The average shelf-life of all-purpose flour is about 8 months, but freezing it can extend its life by another year and a half! just store it in an airtight container and stick it in the freezer to avoid wasting it.
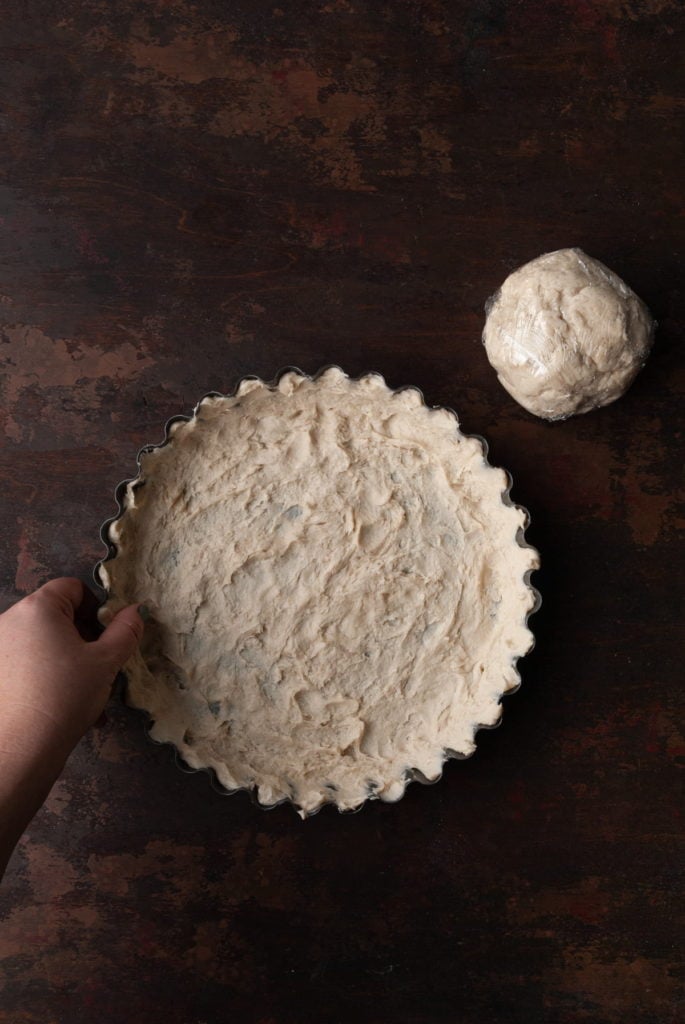
Cut Your Dough in Half
This recipe will yield enough dough for both the bottom and top crust of a pie.
Use your hands to separate the dough into two roughly even parts. Press one-half of the dough into your pie dish, pushing and spreading the dough to form a thin, even layer of crust covering the bottom of the dish.
Then, use your pointer finger and thumb to pinch the dough up the sides of the dish, until the whole dish is evenly coated in the dough.
Roll the second half into a ball and wrap with saran wrap. Place the balled-up dough and the pie dish into the refrigerator and let it rest for at least two hours.
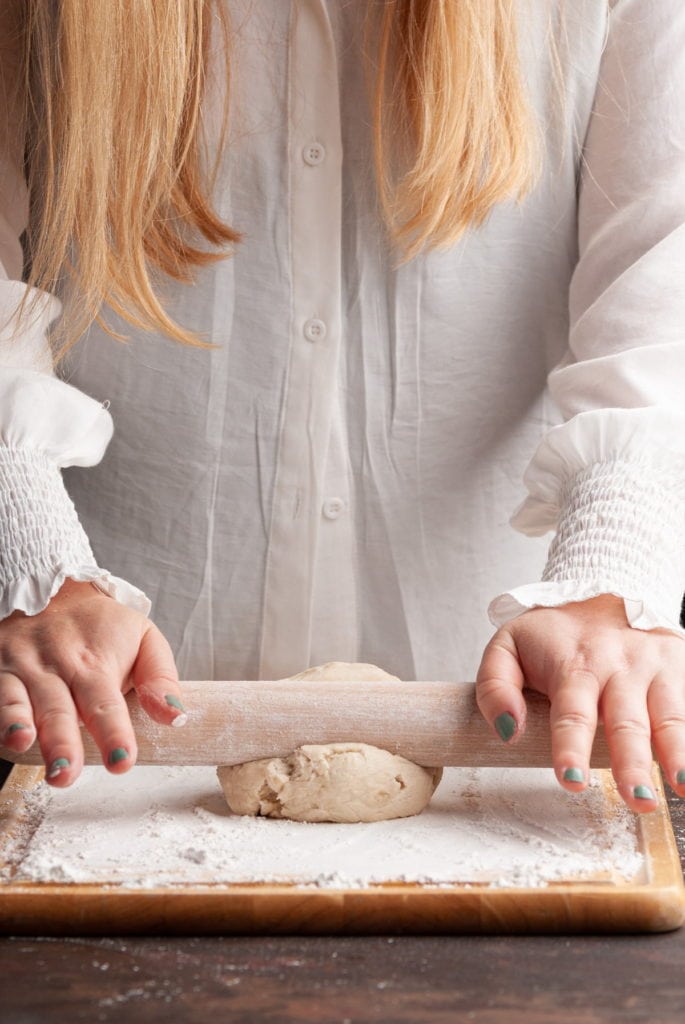
Generously Flour Your Surface and Hands
After your dough rests for two hours, it’s time to shape it!
Remove your balled-up dough from the refrigerator and prep a countertop or cutting board by cleaning it, drying it, and dusting it with a generous amount of flour.
You want to easily be able to remove the dough from the surface, so be generous with the flour! You’ll also want to add flour to your rolling pin to avoid the dough sticking to it.

Roll Your Top Crust Out
Use your floured rolling pin to flatten your dough, working it in all directions until it is roughly 9-inches in diameter. It does not by any means have to be a perfect circle, but you want enough surface area to cover your circular pie dish.
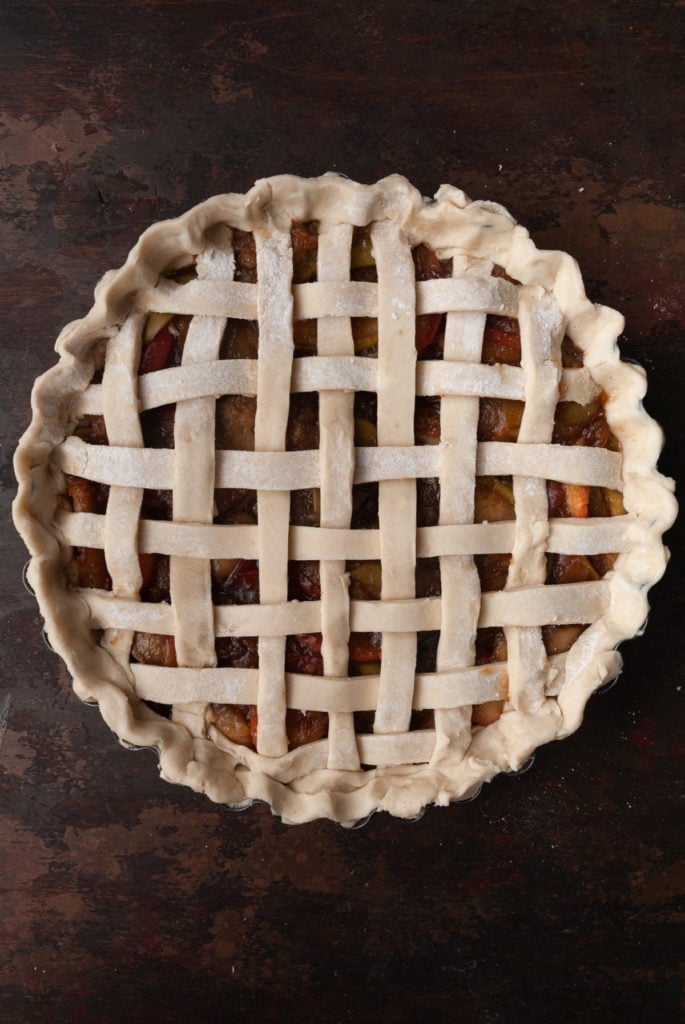
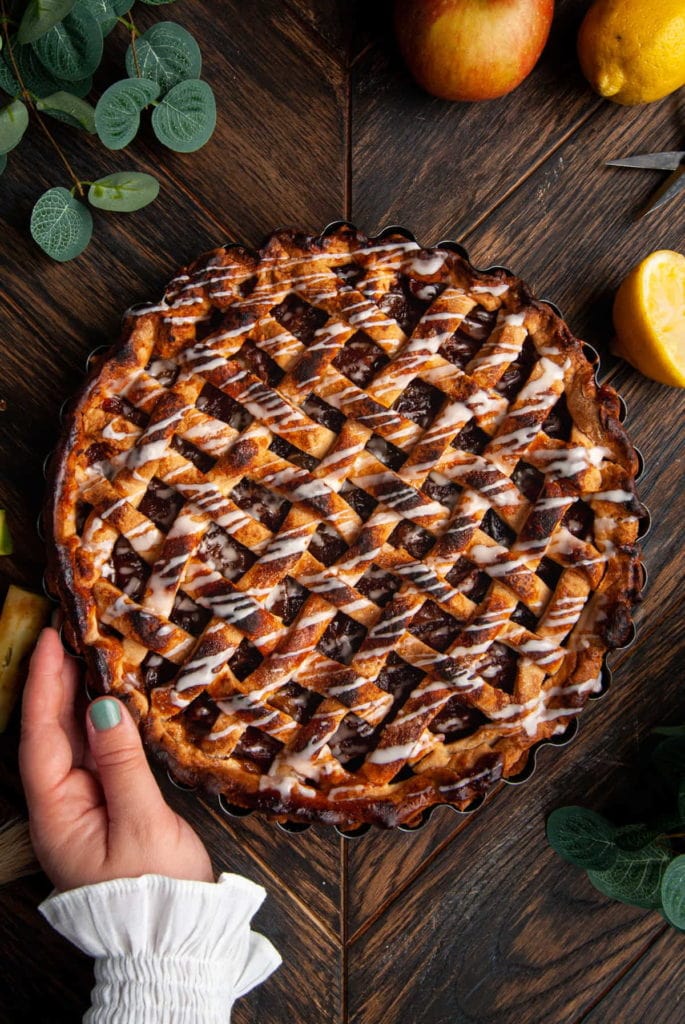
Achieving a Classic Lattice
I’ve been at it for years and mine is still a little wonky. I’ve grown to love the raw, homemade look of my rustic All-Butter Blender Pie Crust.
My advice is to not worry about it being perfect. You can spend hours in the kitchen that way. It WILL taste good, and that’s the point, right?
Regardless of your level of perfectionism, below I will outline my best tips for achieving that classic lattice top. And if the lattice is not for you, skip to the next section for a less fussy but still traditional pie crust topping option.
1. Slice into Thin Strips
I use this handy lattice roller to smoothly cut my dough into even strips in one motion, but you can also use a pizza cutter or a straight-edge knife. Your strips should only be about 1/2 inch wide.
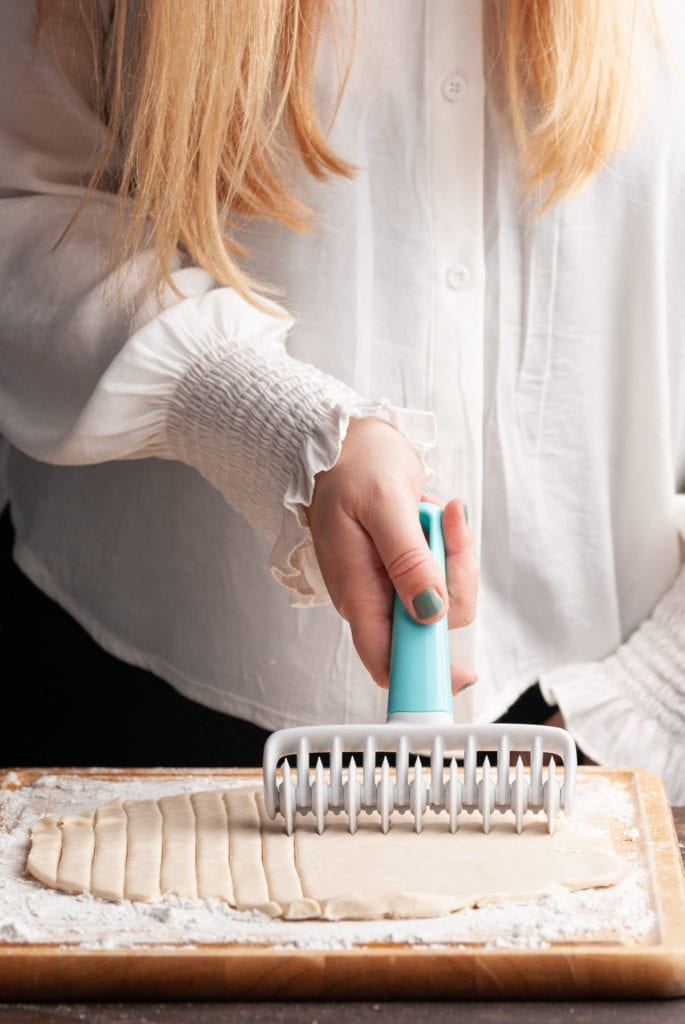
2. Leave Some Room Between Each Strip
Of course, a lattice pie crust is gorgeous, but the real reason for its popularity is because of the ventilation it allows for the steam coming off your filling while your pie bakes.
Start by laying down strips of dough vertically, leaving about 1/2 inch of space between each strip.
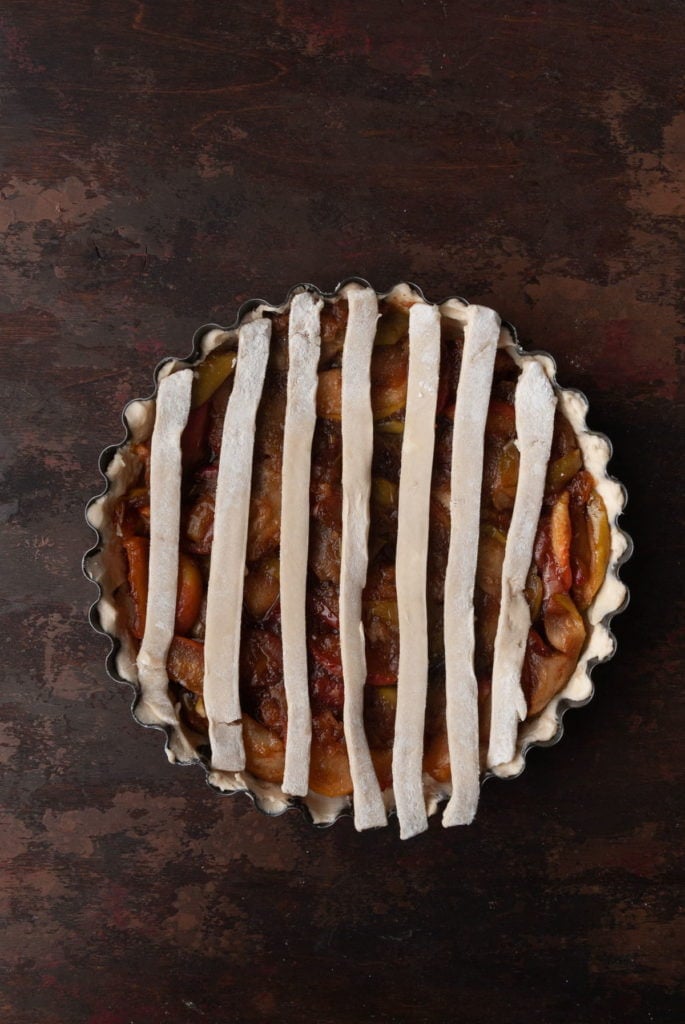
3. Weave Your Strips
Next, one at a time, start to add your horizontal strips, weaving over and under the vertical strips. Continue to add your strips weaving over and under.
Again, leave about 1/2 inch of space between each strip of dough horizontally.
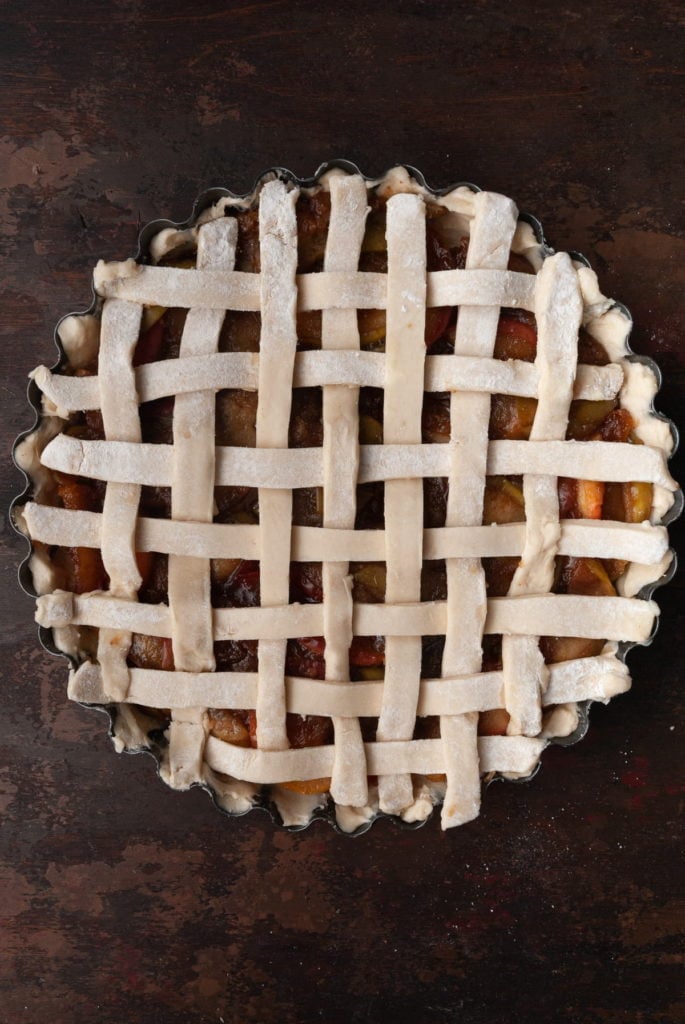
4. Use Leftover Strips to Seal
After forming your lattice, use any extra pie dough strips to run around the inner edge of your pie dish. Use your pointer finger and thumb to pinch the dough against the inside of the pie dish, forming the top edge of outer crust.
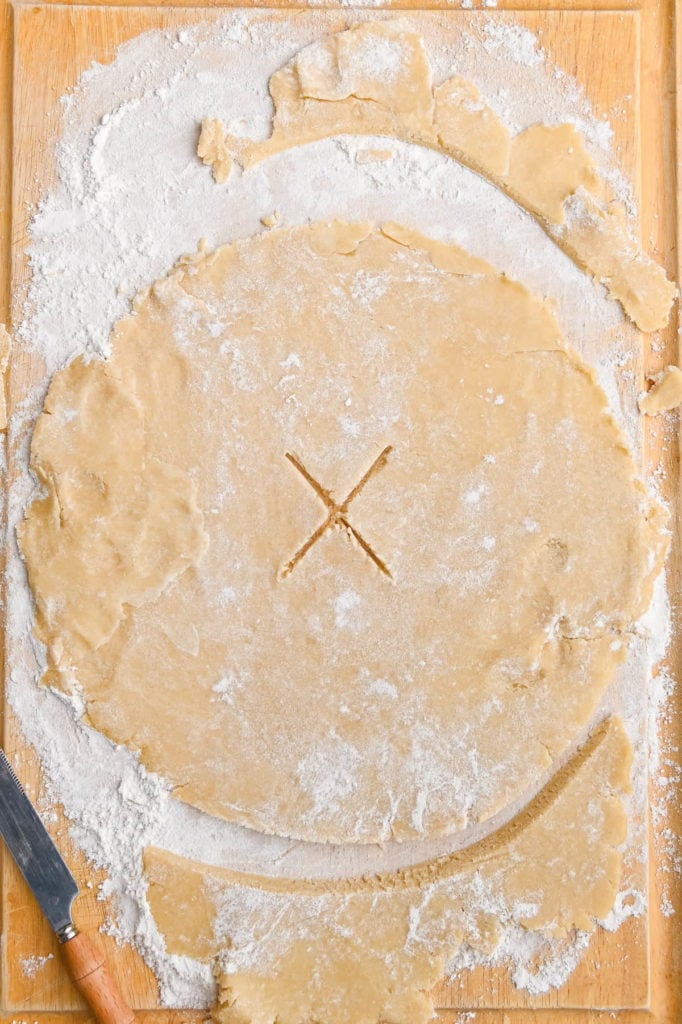
Leave an Air Pocket
If you’re looking for a simpler top crust design, look no further! A classic top crust for pie can be easily made by simply slicing an “X” shape in the center of the dough.
Once you’ve rolled your dough out flat, take your pie dish and place it on top. Use a knife to cut around the dish so you are left with a top crust that’s the perfect size.
Slice your “X” in the center of the top crust so the steam from your pie filling has a place to escape.
Carefully place your top crust on your pie and pinch the edges around the dish to seal.
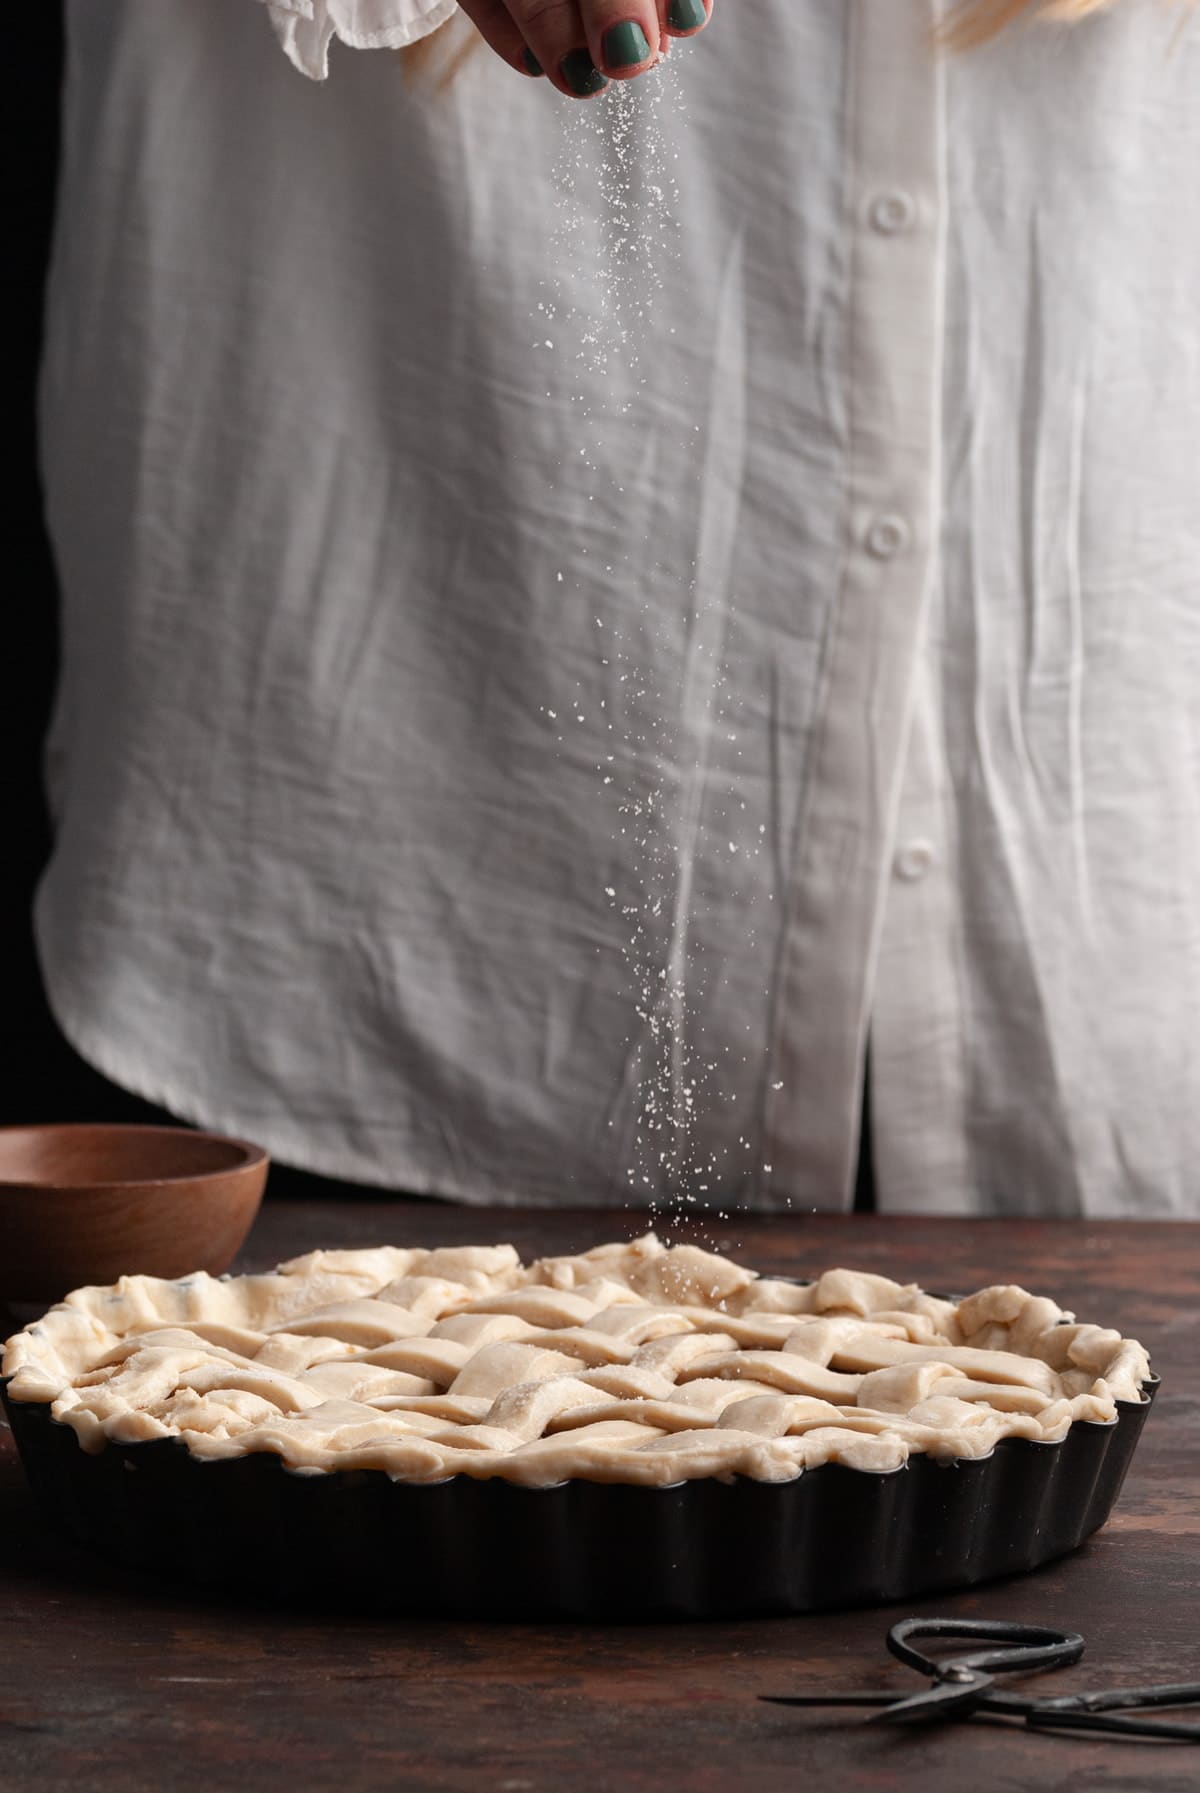
Brush and Sprinkle
Once you’ve created your top crust, brush it with the egg whites and sprinkle it with granulated sugar.
This will get you a crispy caramelized top crust that matches up to your delicious filling!
Bake At Two Temperatures
The best way to ensure you don’t overbake the filling, but do avoid a soggy bottom crust is to actually bake your pie at two different temperatures.
You’ll start out at 425°F for 20 minutes, then bring your oven temperature down to 375°F for the remaining 40 minutes.
Blender Pie Crust Frequently Asked Questions
Can you use a blender as a food processor for pie crust?
As long as you have a high-powered blender, you can use that in place of a food processor for pie crust.
Can you use a blender to mix pastry?
A high-powered blender like this Ninja is a great way to easily mix pastry. It’s best to use the “pulse” function to avoid overmixing.
Is pie crust better with butter or shortening?
All-butter pie crust has a more buttery taste and is flakier, making it my preference for pie crust. However, if you are making intricate designs or are looking for an absolutely perfect presentation on your crust, crusts with part shortening are a little easier to work with.
Why You Should Make this Blender Pie Crust
- It’s so flaky. This pie crust is so buttery and has the most perfect flaky texture.
- The blender does the job for you! It’s as easy as dumping the ingredients in and blending to bring your dough together.
- It’s versatile. No matter the filling, this crust is sure to pair beautifully with it!
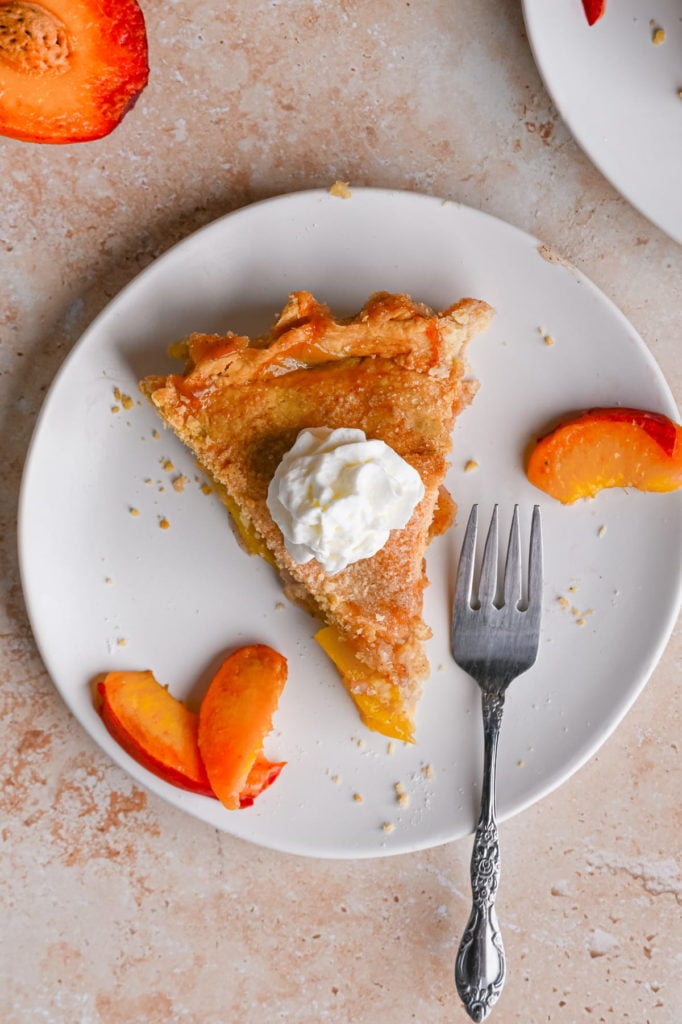
If you’re loving this All-Butter Blender Pie Crust and want ideas for filling, check out this Drunken Apple Pie and this Peach Mango Pie.

All-Butter Blender Pie Crust
Print Save RateEquipment
- Food Processor * or *
Ingredients
- 1 cup unsalted butter, frozen (1 cup usually = 2 sticks)
- 3 cups all-purpose flour
- 2 tablespoons light brown sugar (tightly packed)
- ¼ teaspoon salt
- ½ cup cold water
- 1 egg white
- 1 teaspoon granulated sugar
Instructions
All-Butter Pie Crust Recipe
- Add your butter, flour, brown sugar, and salt to a food processor or blender and blend until butter starts to cut into the dough.
- With your food processor or blender on high, add the cold water and blend for about 10-15 more seconds.
- Transfer the contents of the food processor/blender to a large mixing bowl, and use clean hands to work the dough until no extra flour is left behind. You will likely still have chunks of butter in your dough!
- Split the dough roughly in half. Roll one half into a ball, wrap it in saran wrap or a clean kitchen towel, and place it in the refrigerator.
- Use your hands to press the other half into your pie dish, using your index finger and thumbs to pinch the crust up against the sides of the dish. Put your pie dish in the refrigerator, and let both halves rest in the refrigerator for two hours.
Pie Crust Assembly
- Preheat your oven to 425°F.
- Remove your ball of dough from the refrigerator. Flour your surface and rolling pin, and roll out the dough until it is roughly 1/2 inch thick. Cut into strips to make lattice (detailed instructions above), or cut out an “X” shape in the center, to allow steam to escape the top while baking.
- Add cooled filling to the pie dish with crust, and add your top crust. Brush the top crust with egg whites and sprinkle with granulated sugar.
- Bake for 20 minutes at 425°F, then lower the oven to 375°F and bake for another 40 minutes. Your filling should be bubbling and very aromatic.
- Allow your pie to cool before diving in!
Pro Tips
- For pie filling ideas and recipes, check this list of 6+ Easy Pie Recipes.
Share This Recipe