
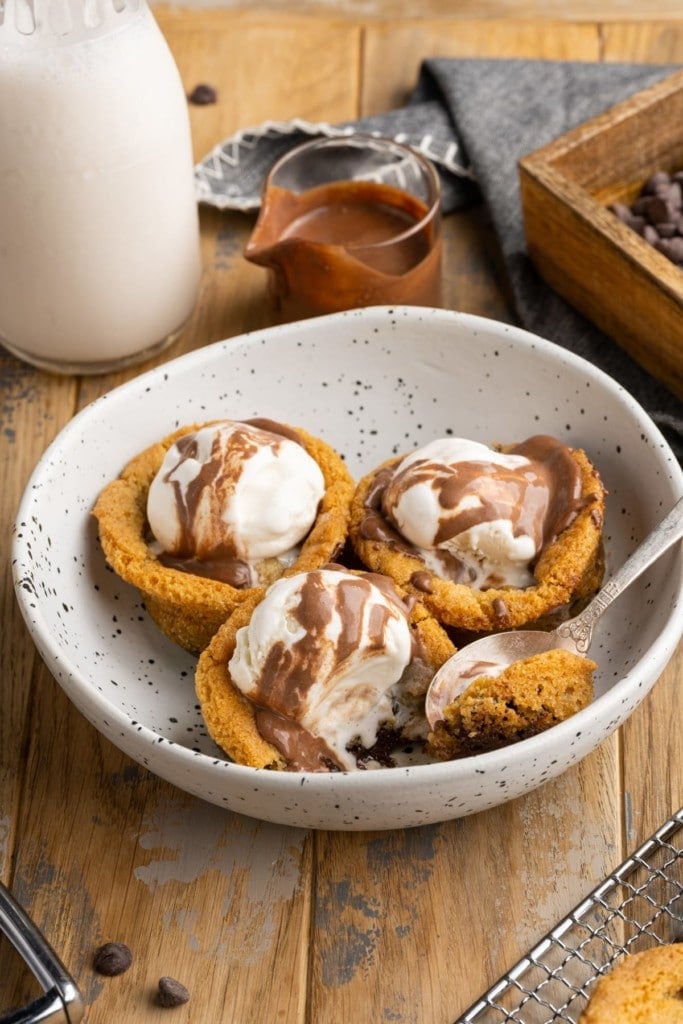
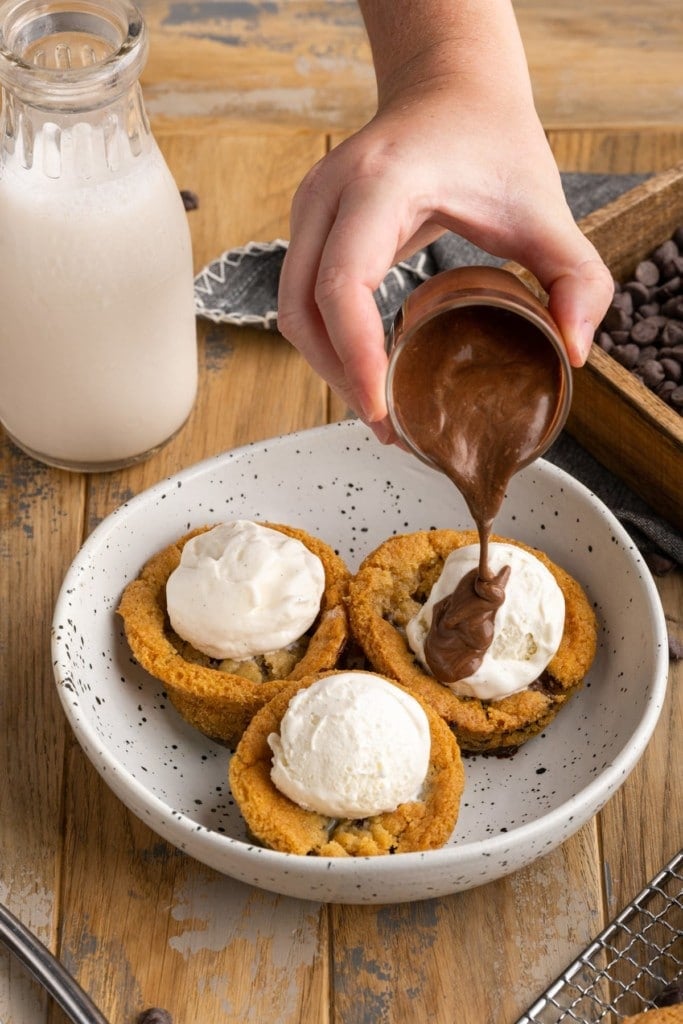
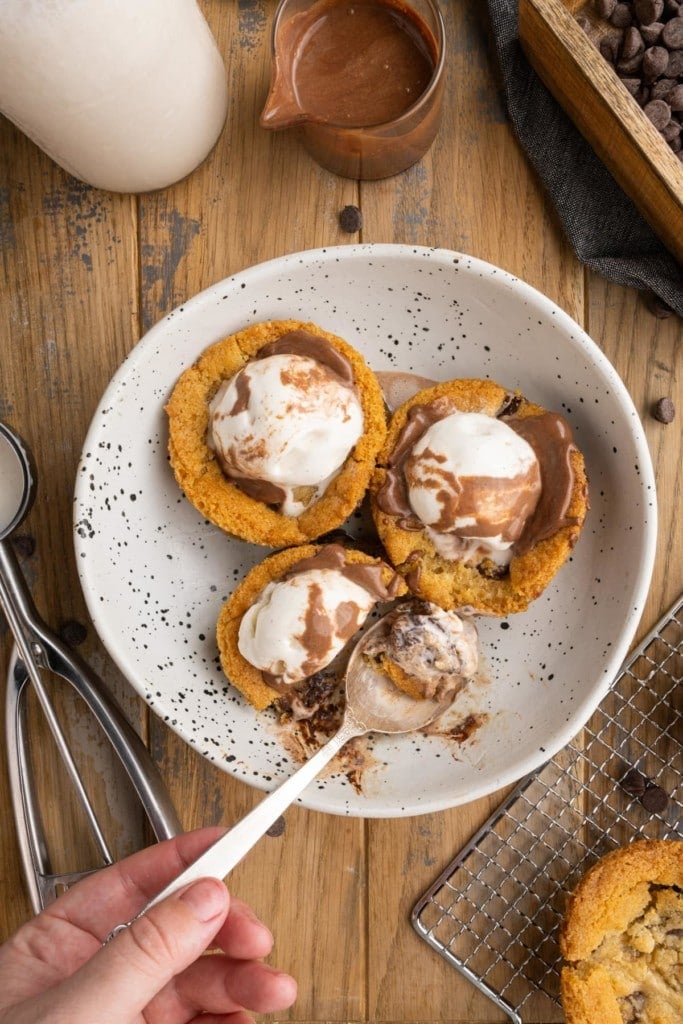
Why use a cone when you can use a cookie? These Cookie Dough Cups for Ice Cream are chocolaty, buttery, handheld heaven!
Sometimes, your sweet tooth is on high, and your favorite ice cream alone simply doesn’t cut it. But add this decadent, hold-in-one-hand-sized, edible vessel to scoop a dollop of your ice cream into, and now we’re cookin’ with gas.
The Development of Cookie Dough Cups for Ice Cream
I have to admit, the discovery of this recipe was the happiest of accidents.
My goal was to try to replicate the ooey-gooey, slightly undercooked, heaping pile of perfection that is a classic Gideon’s Bakehouse cookie, so I tweaked my chocolate chip cookie recipe a bit and thought “hmmm, if I bake them in a muffin tin, maybe they won’t go flat?”.
Update: The Gideon’s Bakehouse Cookie Copycat recipe has been perfected, and is definitely worth trying, too!
I took them out of the oven and “HOLY MOLY! What a beautiful lil’ muffin! Not exactly what I had in mind, but I know they’ll taste good”.
Aaaaaaaand then they deflated in the middle. But I didn’t deflate! Because that’s when my lightbulb went off.
These things are begging for a creme-de-la-creme, melty, sticky scoop of vanilla ice cream! I played it off to my husband like it was my intention all along. Because sometimes little mishaps in the kitchen end up baking into the sweetest, tastiest treasures.
I’ve made these four or five times since. This is only made more impressive by the fact that I only discovered them a few weeks ago. Blame it on “experimentation”—it’s for the greater good!
Anyway, now it’s your turn! I recommend using dark chocolate chips for a more intense chocolate flavor. Oh, and if you really wanna show off your dessert-making skills, fill these with this Boozy Chocolate Mousse. Warning: that combo is only for the sweetest of sweet teeth.
And again, I’ll leave you with this. Something to ponder: why use a cone when you can use a cookie?
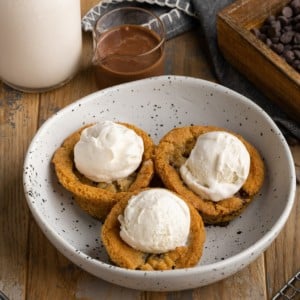
Say hello to ice cream’s new best friend: Cookie Dough Cups for Ice Cream.
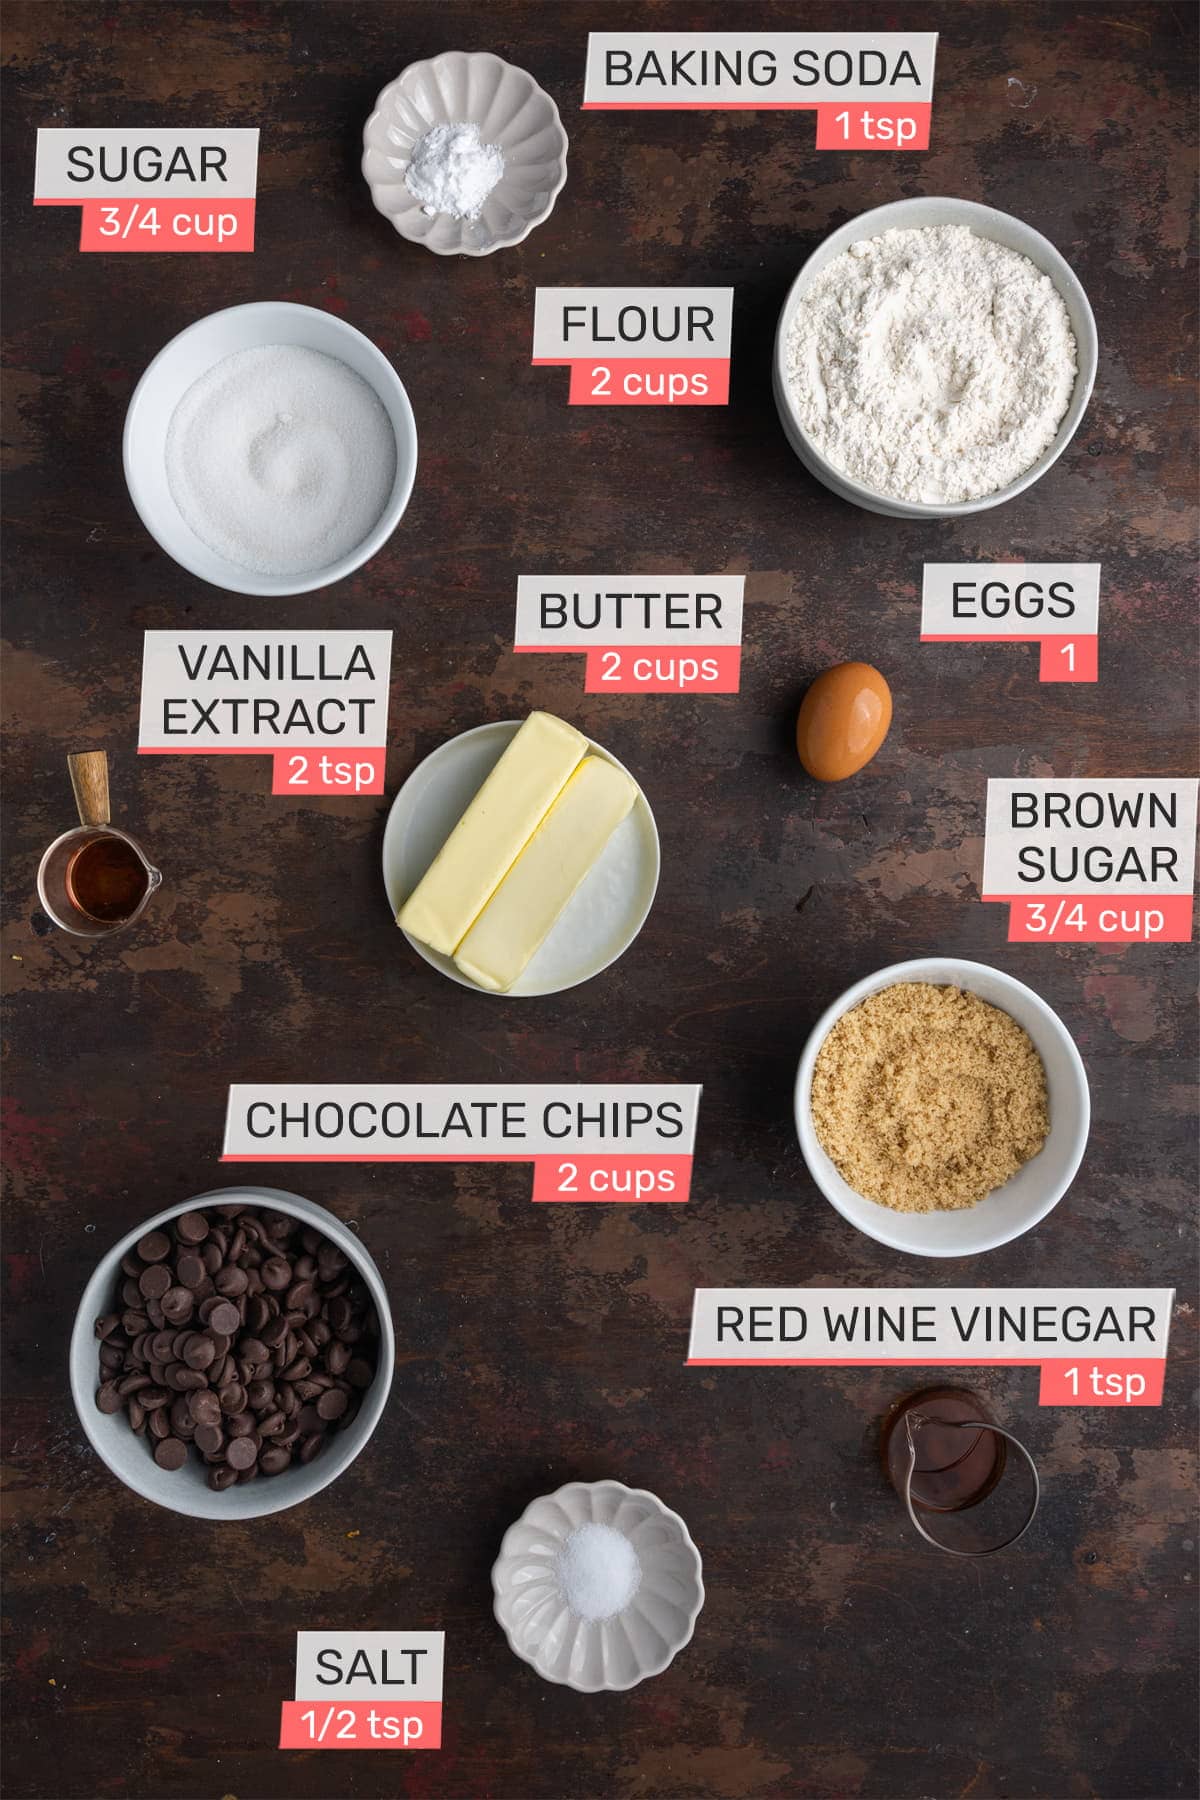
Cookie Dough Cups for Ice Cream Ingredients
Here’s everything you’ll need:
- Unsalted butter. It needs to be softened to get the right consistency.
- Brown & granulated sugar. The combination of both is the best way to get great cookies! The granulated sugar helps aerate the dough when creamed with butter, and the brown sugar adds flavor.
- Vanilla extract. To amp up the flavor!
- Red wine vinegar. To react with the baking soda and help the cookie dough cups rise. You can substitute white wine vinegar or apple cider vinegar to achieve similar results.
- Egg. To act as a binder.
- All-purpose flour. The base of your cookie dough cups for ice cream.
- Baking soda. For rise.
- Salt. For flavor.
- Chocolate chips. You can use dark chocolate or semi-sweet. My preference is dark chocolate!
- Ice cream of choice for serving. These cookie dough cups go great with ANY flavor of ice cream!
Cookie Dough Cups for Ice Cream Tips and Tricks
Make Sure Your Butter is Softened
The key to getting this batter just right is all in the softened butter! You know your butter is softened when you poke it, and your finger leaves an imprint.
I usually take my butter out a couple of hours before baking these to allow it to soften naturally, but if you don’t want to wait, have no fear! Microwaving your whole sticks on high for 20 seconds usually does the trick.
If after 20 seconds, your butter is still too cold and solid, continue to heat in 10-second intervals until your finger leaves an imprint.
Green tip: Look for organic and palm oil-free butter if you can. Buying organic means you are supporting farms that do not use damaging pesticides and fertilizers, and palm oil production is a huge driver behind deforestation.
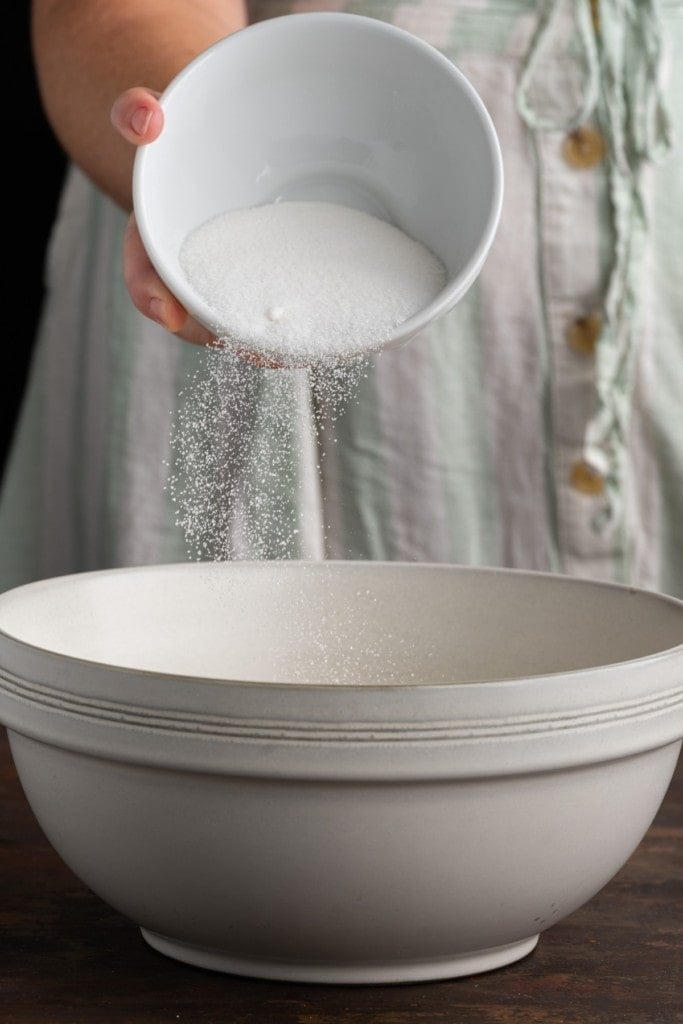
Cream the Butter and Sugar First
A hand mixer is the best tool to cream the sugar and butter together for the base of your batter. It’s also the easiest way to integrate the rest of your ingredients while avoiding lumps.
I recommend a hand mixer over a stand mixer in this case because we don’t want to overbeat the batter and make our chocolate-chip-loaded cookies too dense. Especially after you add the egg, overbeating will have a large impact on your dough.
Add the butter and both sugars to a large mixing bowl and use the hand mixer on high to cream together until smooth to aerate your dough (about 45 seconds).
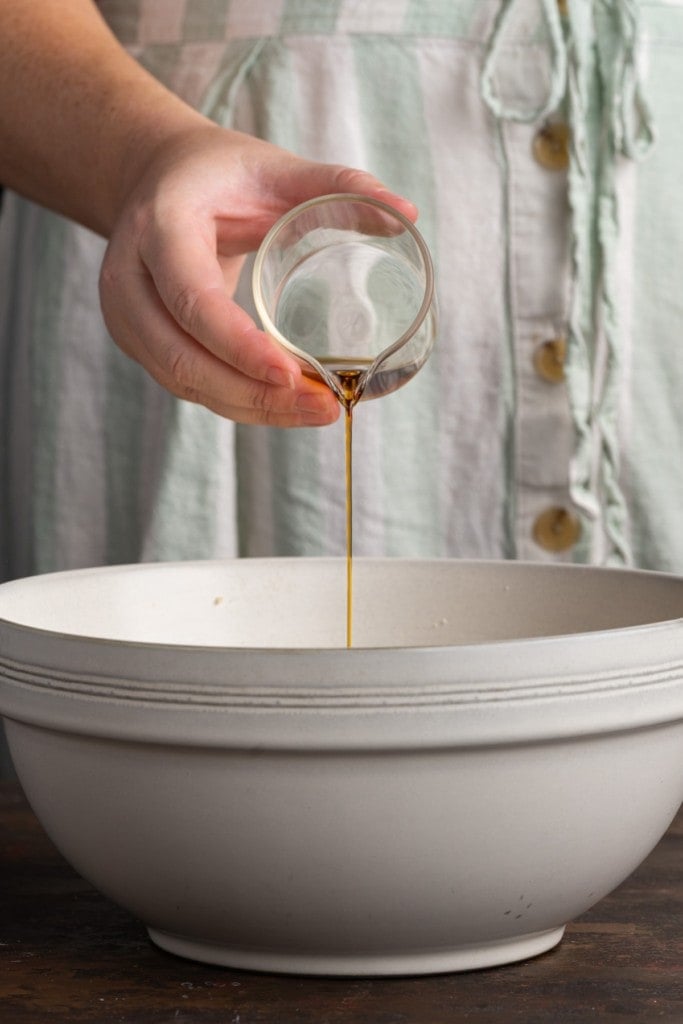
Add the Extract and Vinegar Next
Once you’ve creamed your butter and sugar together, add the vanilla extract and red wine vinegar and mix again until smooth and combined.
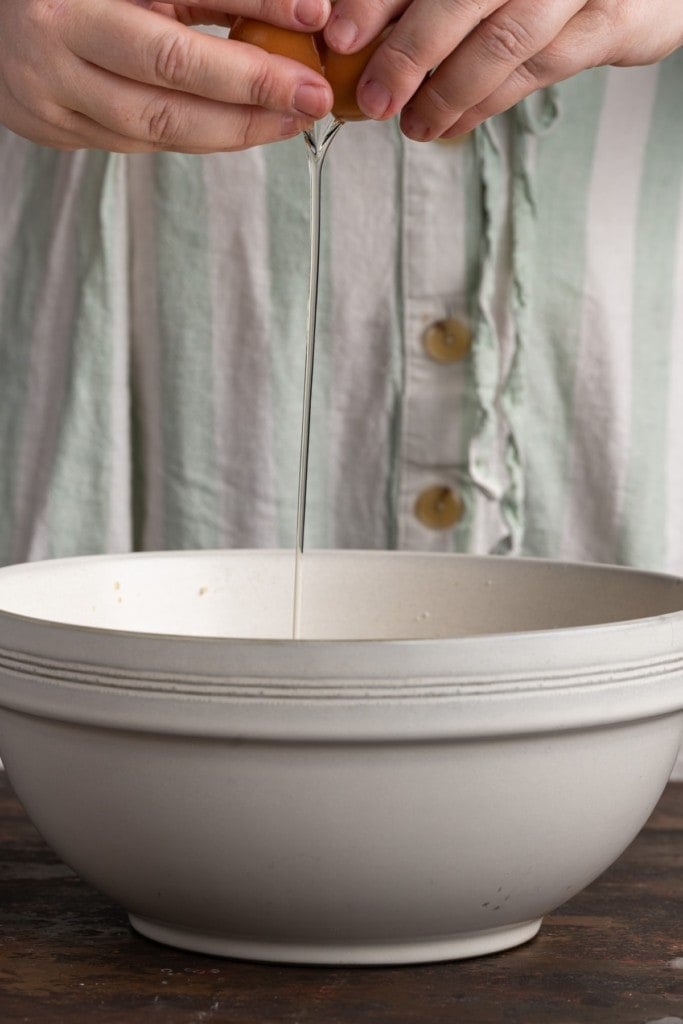
Fold in Your Egg
The key is not to overbeat it! Overbeating the eggs, in this case, may cause your cookie dough cups to be denser and chewier. We are looking for soft and gooey here, to compliment your favorite ice cream!
Green tip: Look for pasture-raised eggs (over free-range or cage-free) to support agriculture that is less reliant on chemicals and fossil fuels.
It’s also best practice to crack your egg into a separate bowl first, just to make sure you didn’t stumble upon a bloody egg, and to ensure you don’t get an eggshell in your cookie dough.
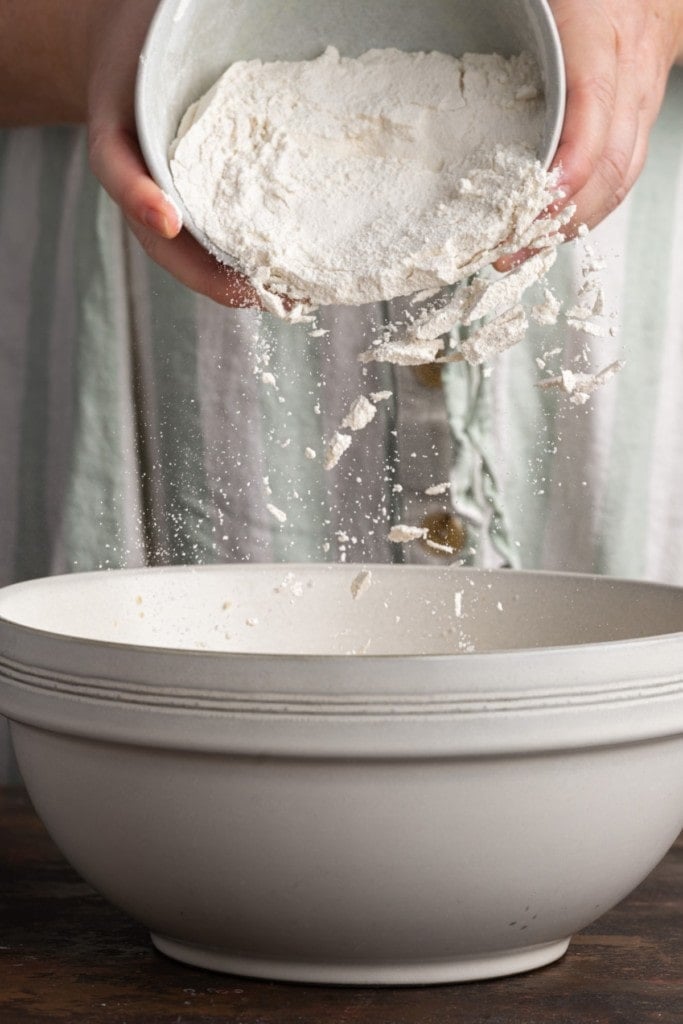
Add Your Dry Ingredients
Once you have a smooth mixture of butter, sugar, vanilla extract, red wine vinegar, and egg, it’s time to add your flour, baking soda, and salt.
Green tip: 50% of food waste happens at home. The average shelf-life of all-purpose flour is about 8 months but freezing it can extend its life by another year and a half! just store it in an airtight container and stick it in the freezer to avoid wasting it.
Use your hand mixer again to integrate the dry ingredients into the dough, be careful to only mix until the dough is smooth and no more.
Fold in Your Chocolate Chips
This recipe calls for 2 whole cups of chocolate chips! 2 cups are plenty, but I’m a firm believer that when it comes to chocolate chips, measuring cups aren’t necessary. Measure with your heart! 😉
Green tip: Make sure your chocolate is sustainably sourced. Look for Fair Trade, Rainforest Alliance, or UTZ certifications as opposed to self-proclaimed sustainability labels that sometimes falsely advertise “sustainably sourced”.
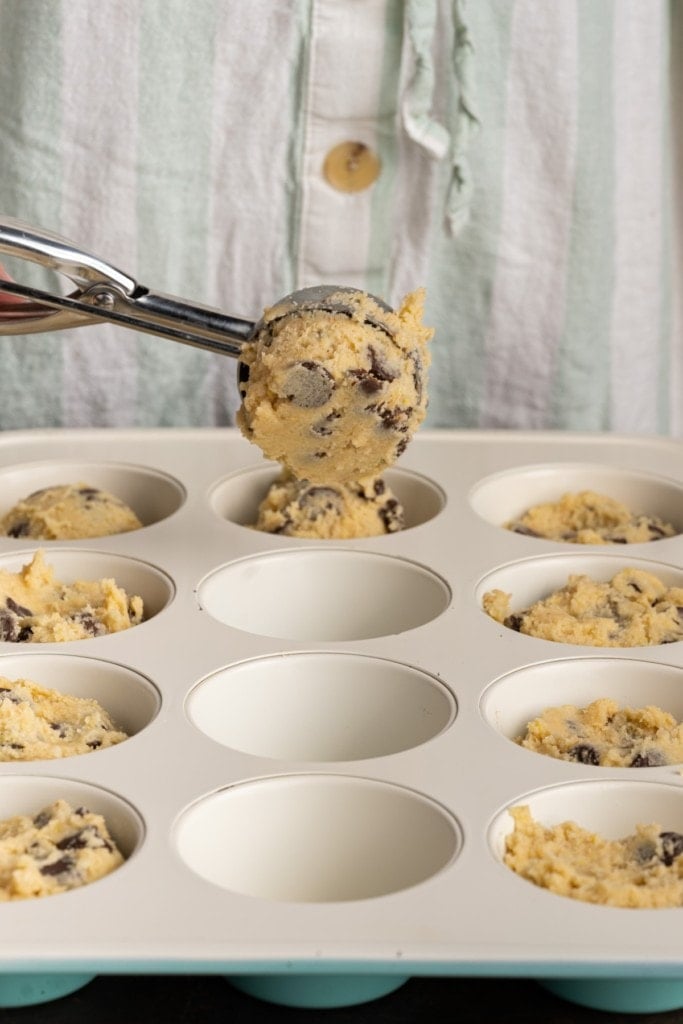
Grab Your Muffin Tin
No need to line or spray, there is enough butter in this dough to make your cookie cups naturally non-stick.
Fill each cup with dough, leaving about 1/2-inch of space on top to allow the cookie dough to rise.
Let Them Cool, But Serve Them Warm
When you first take them out of the oven, they will look like muffins, but as they cool, the middle will sink in to form that delectable cookie dough cup for ice cream.
The key is to serve them warm with your cold ice cream. If you’re not having them fresh out of the oven, chuck them in the microwave for about 20 seconds before scooping your favorite ice cream in them. Because I’m telling you, this is the absolute ultimate a la mode.
How to Store and Save These Cookie Dough Cups
These will stay fresh and tasty at room temperature for 3-4 days, but if you are way more disciplined than me and my family, and anticipate them lasting longer, freeze some!
Wrap them individually and keep them in the freezer for up to 4 months. Thaw at room temperature or microwave them in 30 seconds intervals until warm when you are ready to eat!
Cookie Dough Cups Frequently Asked Questions
Can you use cupcake liners for cookies?
Baking cookie dough inside a muffin tin means the cookies will not have the opportunity to spread too flat. Instead, you are left with a thick and doughy cookie dough cup.
For this recipe, you do not need to use cupcake liners in the muffin tin. The dough has enough butter for the cookie dough cups for ice cream to be naturally nonstick.
What can I use instead of a cookie scoop?
To shape cookie dough without a cookie scoop, use a spoon or your hands!
Why You Should Make These Cookie Dough Cups for Ice Cream
- They are no fuss. One bowl and a muffin tin and you’re set!
- They are out of this world delicious. Buttery, caramel-y, chocolate delight with every bite.
- They taste as good as they look. They have the cutest cup shape, just begging for a scoop of your favorite ice cream!
- They beat out a cone any day. The ultimate à la mode.
If you love this recipe and are looking for more cookie-inspired treats, check out this Cakey Chocolate Chip Cookie Cake and Rich Vegan Chocolate Oreo Pie!
Homemade Cookie Dough Cups for Ice Cream
Print Save RateEquipment
Ingredients
- 2 cups unsalted butter, softened (2 cups usually = 2 sticks)
- ¾ cup brown sugar (dark or light)
- ¾ cup granulated sugar
- 2 teaspoons vanilla extract
- 1 teaspoon red wine vinegar
- 1 large egg
- 2 cups all-purpose flour
- 1 teaspoon baking soda
- ½ teaspoon salt
- 2 cups chocolate chips (dark or semi-sweet)
- ice cream of choice (for serving)
Instructions
- Preheat the oven to 350°F.
- To a large mixing bowl, add butter and both sugars. Use a hand mixer on high to cream together butter and sugar until smooth (about 45 seconds).
- Add the vanilla extract and red wine vinegar and mix to combine.
- Add the egg and use a spatula to fold it into the dough.
- Add the flour, baking soda, and salt and mix to combine until smooth, careful not to mix more than necessary.
- Fold in the chocolate chips.
- Use a cookie scoop or spoon to fill 12 cups of a muffin tin with the dough, leaving about ½-inch of space at the top to allow the dough to rise.
- Bake for 12-14 minutes and transfer to heat-safe surface or cooling rack to cool.
- Wait about 15 minutes for cookie cups to form their final shape. The center will sink as they cool, forming a cookie dough cup for ice cream. Serve with ice cream and enjoy!
Pro Tips
- Make sure your butter is just softened, not completely melted.
- Use your favorite chocolate chips!
- Cookie monsters are always happy at my house with this delicious selection of my best cookie recipes to choose from! Nom nom nom!
Video
Share This Recipe


6 thoughts on “Homemade Cookie Dough Cups for Ice Cream”
These look so amazing!!! Wondering about the red wine vinegar…?
Soooo tasty!! The red wine vinegar reacts with the baking soda to help them rise, so that the baking soda doesn’t “eat up” the sugar to activate, leaving them with a sweeter taste!
Not sure if a more perfect dessert exists. My fiancé and I devoured these. It’s a must make!!
The best of everything in one humble cookie cup!!
Can I come over for dessert?
Haha! You’re welcome anytime ☺